Most people buy their first podcast microphone backwards. They watch a gear video, order whatever the thumbnail told them to order, plug it into a laptop, hit record in a room with a window unit rattling and a fridge humming through the wall, and then spend six months wondering why they sound worse than guests on shows recorded on cheaper gear.
I have edited more than 4,000 episodes for other people. That means I have heard every mistake in the book, including a host who recorded with the mic pointed at the ceiling and a guest who sounded like he was calling from inside a washing machine. Here is the part nobody wants to hear: choosing your first podcast microphone is a room decision before it is a gear decision. The mic does not decide how you sound. The mic plus the room decides how you sound, and the room usually wins.
So this guide is not a spec sheet recital. It is the decision I walk new podcasters through in my studio, the two mics that sit at either end of that decision, and the setup steps that turn a cheap mic in a bad room into something people will actually finish listening to.
Why you should trust me
I am a podcast editor and audio engineer in Brooklyn. I have cut 4,000+ episodes for other people, which is a polite way of saying I have spent a decade listening to other people's rooms. I run a small studio where I record voiceover and teach podcasters how to sound good, and I have put 30+ microphones in front of my own mouth in two very different spaces: a treated home studio and an untreated kitchen, because most podcasters record in untreated kitchens.
I keep spectrograms of every mic I work with. I keep notes on noise floor, off-axis rejection, and how each one survives a real edit, meaning the part where I have to cut out a chair creak, a passing truck, or a plosive that landed like a punch. I do not care what a frequency response chart brags about if the mic picks up the fan in the next room.
How I judge a mic before I recommend it
The criteria are boring and they are the only ones that matter for spoken word.
The room first. Before I judge a mic, I judge the space it will live in. I record 30 seconds of silence in the recording position and listen back on headphones at a normal level. Whatever I hear in that silence, the mic will hear louder. That single test tells me more than any review.
Off-axis rejection. For a home podcaster with a noisy street outside, this matters more than frequency response. A mic that ignores the sides of the capsule is a mic that ignores the neighbor's dog, the keyboard, and the HVAC vent above your desk.
Plosives and proximity effect. Every voice mic will boom when you get close. The question is whether it booms in a way I can fix with a high-pass filter or in a way that ruins the take. Good proximity effect is usable low end. Bad proximity effect is a pop that clips.
Gain staging headroom. A mic that needs a mountain of clean gain is a mic that will hiss through a cheap preamp. If the signal is noisy before it reaches your recorder, no plugin fixes it later.
The mount and the accessories. I have heard a $300 mic ruined by a $15 desk stand that picked up every keystroke. The arm, the shock mount, and the pop filter are not accessories. They are part of the microphone.
The software layer. On USB mics, the app is half the product. On-mic EQ and compression are becoming standard, and the brand with the best auto-EQ wins the next round. That is where I expect the entry market to be decided.
The two mics this decision comes down to
These two sit at opposite ends of the same question: does your room deserve a condenser, or does it need a dynamic? Answer that honestly and the choice makes itself.
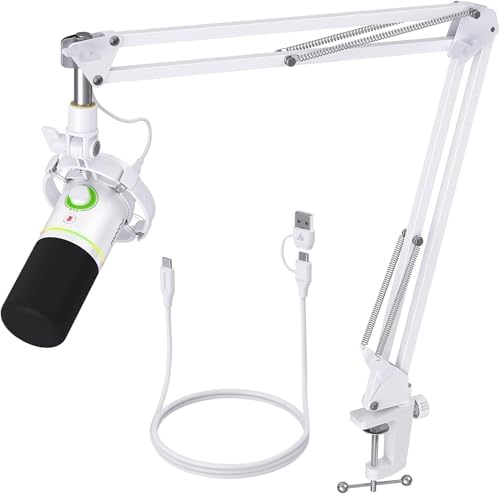
The dynamic pick: MAONO PD200XS XLR/USB Dynamic Microphone Kit, RGB Gaming Mic with Software
 Visit on Amazon →
This is the mic I hand to the podcaster recording in a kitchen, a bedroom, or a shared apartment. It is a dynamic, which is the whole point: dynamics are for real life, and the capsule design that makes them less sensitive to detail is the same design that makes them less sensitive to your refrigerator. If your room is untreated and your street is not quiet, this is the end of the decision for you.
The XLR/USB part is the other reason it belongs in a first-gear conversation. You can start on the USB path today, record an episode tonight, and add an interface later if you ever figure out why you need one. That is a real advantage for a beginner, and it is the reason I stopped telling every new podcaster to buy an interface in month one. The interface plus XLR path is for people who know why they need it.
The software is where I would set expectations. On-mic DSP is the direction the whole entry market is heading, and a built-in EQ and compression curve means you can sound finished without learning a plugin chain. But the software layer on newer USB brands is hit or miss, and it is the first thing I would test in the return window. The RGB lighting is aimed at streamers more than podcasters. Leave it on if you like it, turn it off if you record video, and either way it does not change how you sound.
Flaws but not dealbreakers: A dynamic needs more clean gain than a condenser, so a very cheap preamp can add hiss before the signal ever reaches your editor. The kit is also built for a desk, so if you type while you talk, budget for a boom arm and a shock mount in the same order.
Anyone recording in an untreated room, a rented apartment, or a space with street noise should start here and stop shopping.
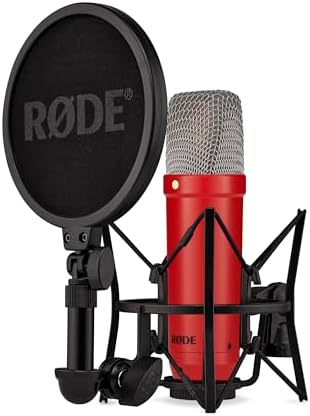
The condenser pick: RØDE NT1 Signature Series Studio Condenser Microphone, Black
 Visit on Amazon →
This is the studio side of the line. RØDE is one of the legacy brands I still trust as a safe buy, and the NT1 Signature Series is the mic I would point a podcaster at once their room is actually treated and they want the extra detail a condenser gives you. Detail is the trade. A condenser hears more of your voice, and it hears more of everything else too, including the fan in the next room, the chair, and the room tone you have been ignoring.
So the honest version is this: this mic rewards a quiet room and punishes a loud one. If you record in a closet full of clothes, or a small room with a rug, heavy curtains, a bookshelf, and no parallel bare walls, a condenser like this will make you sound like the shows you envy. If you record at a kitchen table under a vent, this mic will make your room sound like the problem it is, and you will blame the microphone.
It also commits you to the studio signal chain. This is not the plug-and-play end of the decision. Plan on a preamp or interface with enough clean gain to feed it, and plan on learning gain staging, because a condenser will show you every mistake in your levels.
Flaws but not dealbreakers: It will expose your room. That is not a flaw in the mic, it is a report on your space, and it is the most useful thing a microphone can tell you. It also wants a proper boom arm and a pop filter, not a desk stand, because a mic this sensitive picks up everything the desk does.
Anyone with a treated room, a quiet space, and a reason to want more detail in their voice should look here. Everyone else should buy the dynamic and put the difference into treatment.
The actual setup workflow, step by step
Now the part that changes how you sound more than either mic will. This works with anything you plug in.
Step one: measure the room before you measure the mic. Record 30 seconds of silence in your exact recording position, with the mic where it will actually sit. Listen back on headphones at a normal level. Write down everything you hear: fridge, fan, street, keyboard, your own breathing. If you can hear it in silence, the mic will hear it ten times louder.
Step two: pick the mic type from the room, not the price. Noisy or reflective room, pick a dynamic and accept the slightly smaller detail. Quiet and treated room, pick a condenser and enjoy it. This one step prevents most of the upgrade treadmill.
Step three: fix the mount before you fix the mic. A boom arm and a shock mount do more for your sound than a mic upgrade, because they stop the desk from becoming part of the recording. If your mount sags after a month, replace it. A mic you have to fight is a mic you will stop using.
Step four: set gain staging before you record a word. Talk at your normal volume and watch the meter. Set gain so your loudest normal peak lands around -12 dBFS. Not -3, where a laugh will clip. Not -30, where you will raise the noise floor in the edit. Do this once and leave it alone.
Step five: set distance and angle. Four to six inches from the capsule is the working zone for spoken word. Then rotate the mic 15 to 30 degrees off your mouth axis, so you are speaking across the capsule rather than straight into it. You keep the usable proximity effect low end and you send the plosives past the diaphragm instead of into it.
Step six: use a pop filter, and put it in the right place. Two inches off the capsule, between your mouth and the mic. It costs almost nothing and it saves entire takes.
Step seven: record 60 seconds and listen back on headphones. Not laptop speakers, not earbuds on the couch. Headphones. You are listening for room tone, plosives, and whether your gain staging held. Fix it now, not after a two-hour session.
Step eight: treat the room before you upgrade the mic. A rug, heavy curtains, a bookshelf, a blanket behind you, or recording inside a closet will do more than the next tier of microphone. This is the step people skip and the step that decides whether you sound professional.
What you do not need yet
You do not need an interface on day one if your mic has a USB path. You do not need a foam panel kit sold as "studio quality," because thin foam on a bare wall does almost nothing below the high frequencies. You do not need a $400 condenser in an untreated bedroom, and you do not need a plugin chain to fix a room problem, because no plugin un-hears a fan. You also do not need a new mic every time you hear someone else's show sound better. They treated their room. That is the whole trick.
What this all costs
Both mics are in the same broad range as a basic interface, which is exactly why I would rather you spend the money on the microphone and the mount and hold off on the preamp until you can hear why you need one. Check current Amazon price on each and compare that against what a treatment kit, a boom arm, and a shock mount would cost, because those three are the purchase that actually changes your recordings.
If you go the dynamic route, your total is the mic, an arm, a shock mount, and a pop filter, and you can record today with no interface. If you go the condenser route, add an interface or preamp with clean gain, plus the same arm, shock mount, and pop filter, plus the treatment that makes the mic worth owning. The second path costs more and sounds better only if you finish the job.
The bottom line
The room is the microphone. I can make a cheap mic sound better than an expensive one in a bad room, and worse than a cheap one in a good room, and I have done both on purpose to prove the point. If you record in an untreated space with noise you cannot control, buy the dynamic, mount it properly, set your gain, and put the leftover money into a rug and a curtain. If your room is quiet and you want the detail, buy the condenser and treat the space first.
Either way, buy the mic you are not afraid to use every week. A microphone that sits in a drawer because the setup is fussy is worse than a worse microphone you record with on Sunday nights. That is the job. Set it up once, learn your levels, and let the room do the rest.