Most people who search for a USB dynamic microphone setup are one purchase away from sounding fine and one bad habit away from sounding terrible. I have heard both versions of that sentence in my own studio, in clients' apartments, and in my kitchen, which is where most of the honest testing happens.
The mic I hand to new podcasters more than any other is a USB dynamic. It ignores most of the room, it does not need an interface, and it does not need a software subscription to sound like a person talking. Everything below is the setup order I use with clients, from the desk to the export.
The truth I keep coming back to: the room is the microphone. I can make a cheap dynamic mic sound better than an expensive condenser in a bad room, and I can make an expensive mic sound worse in a good one. Placement and gain staging decide most of your result, and both are free.
Why you should trust me
I have edited more than 4,000 episodes for other people. The number matters less than what it taught me: I have heard every microphone mistake a human can make, usually three times, usually from the same host who re-records instead of moving the mic two inches closer.
I run a small studio in Brooklyn where I record voiceover and teach podcasters how to sound good. I keep spectrograms of every mic that comes through, because a spectrogram does not care what the box claimed about frequency response. I have tested more than 30 mics in a treated home studio and in an untreated kitchen, because the kitchen is where most podcasters actually record.
The pattern never changes. The room and the placement decide the result. The mic decides the last 10 percent, and no spec sheet will tell you that.
How I test a mic before it earns a workflow
Every mic goes through the same two passes. First, the kitchen test: untreated room, refrigerator hum, a window facing a Brooklyn street, no foam anywhere. If the recording survives that with usable speech, the mic has earned a place in the first-$200 list. Then the edit bay pass: I cut it into a real episode, check the noise floor, listen at 1.5x, and listen on a phone speaker, because a big share of your audience hears you exactly that way.
Two things I am listening for. Off-axis rejection, which is how much of the room comes in when you turn your head. And how the mic behaves when you get loud. A mic that needs an expensive interface to sound decent out of the box fails the first pass no matter what the marketing says.
The gear this workflow assumes
You do not need much. You need one microphone that does not fight your room, and you need to stop letting the desk and the HVAC into the recording. Everything else is optional.
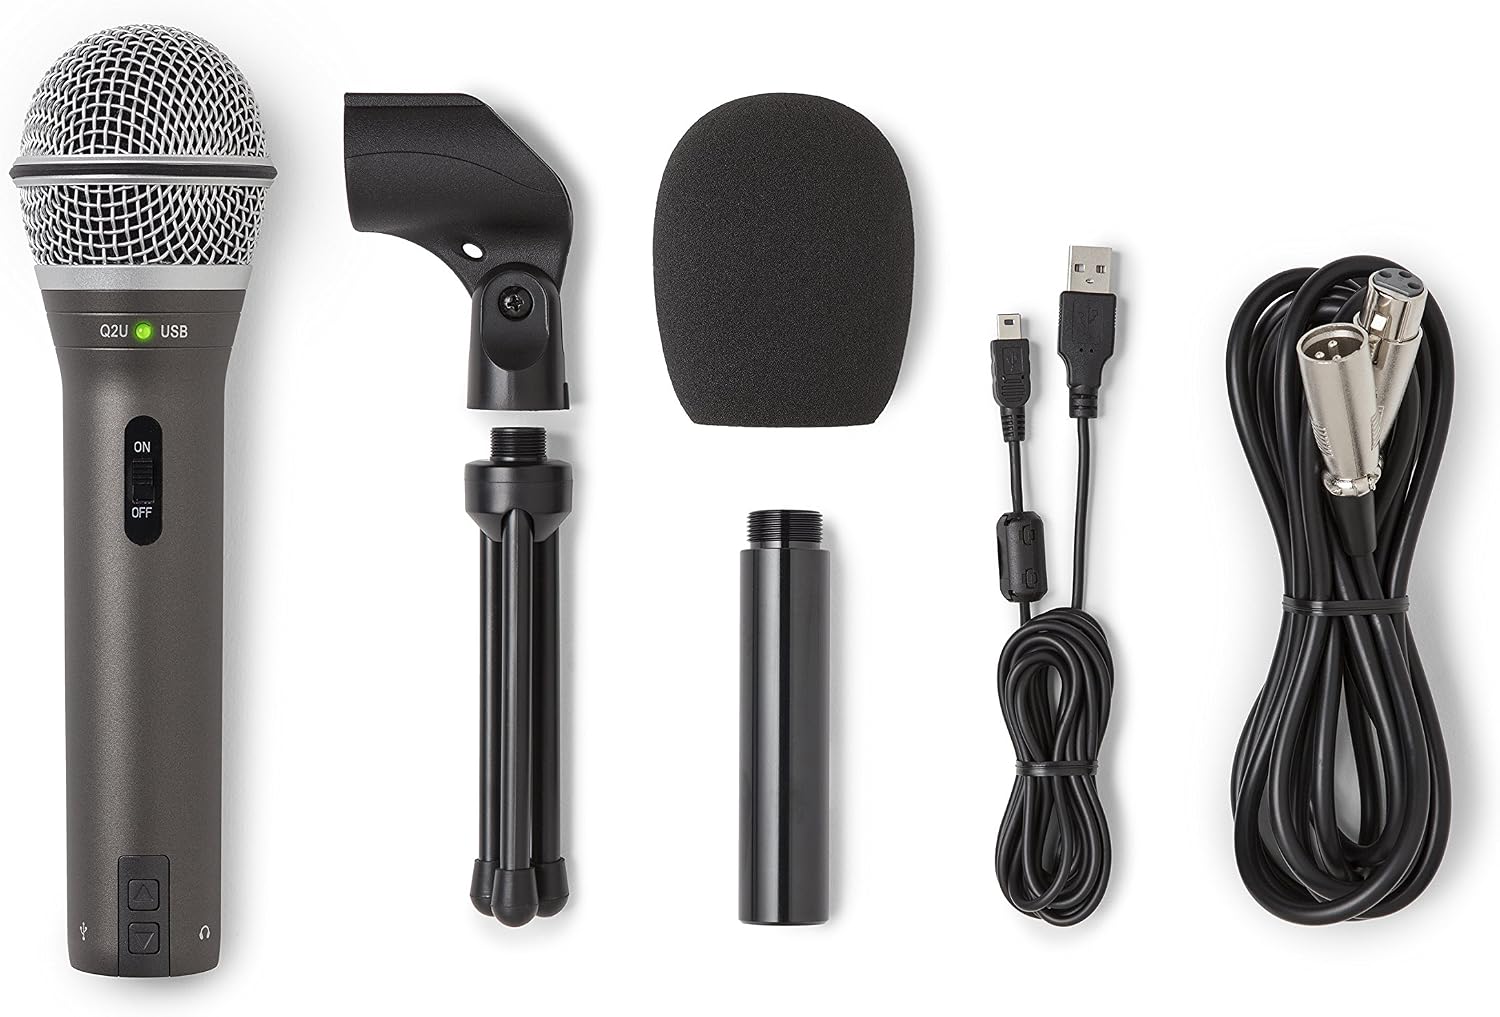
The microphone: Samson Q2U USB/XLR Dynamic Microphone Recording and Podcasting Pack
 Visit on Amazon →
This is a dynamic microphone, and the family matters more than any frequency response graph. A dynamic capsule in an untreated room picks up less of the room than a condenser does, which is exactly what a home podcaster with a noisy street outside needs. The Q2U also does the one trick that makes it my default recommendation: it runs over USB today and over XLR later, so it does not become junk the day you decide to buy an interface.
Check current Amazon price. The pack framing is the part I like, because a first mic purchase should not turn into three purchases and a week of reading forums.
Flaws but not dealbreakers: It is a dynamic mic, so it wants you close. If you insist on sitting a foot and a half away, you will turn the gain up and bring the whole room back in. Get within a hand span and it rewards you.
Anyone starting a podcast at a kitchen table or a bedroom desk, with no interface and no acoustic treatment, should start here.
The studio extra: Blosssound 24 Paris Halloween Socks Bulk with 24 Cards 24 Stickers 24 Plastic Bags DIY Funny Spooky Ghost Pumpkin Bat Witch Socks Lollipop for Women Girls Men Trick or Treat Party Favors Gifts Crafts
 Visit on Amazon →
This is not audio gear and it will not fix your room, so let me be straight about why it is here. If you record a Halloween episode, the pack lists 24 socks with 24 cards, 24 stickers, and 24 bags, which makes it a simple giveaway for guests, listeners, or the kids in the room while you track. Check current Amazon price.
Flaws but not dealbreakers: It is a seasonal purchase. If your show has nothing to do with Halloween, skip it and put the money toward a boom arm or a moving blanket instead.
Anyone recording a holiday episode with a giveaway, or running a studio that doubles as a family room, will get use out of it.
The actual setup workflow
This is the part that changes how you sound. Work through it in order, because step one is free and step eight is where you find out whether the first seven worked.
Step one: Get the mic off the desk. A mic sitting on the same surface as your keyboard hears every keystroke through the desk itself. Put it on a boom arm, or at minimum put a folded towel under the stand. This one change does more than a mic upgrade in most rooms, and I have heard it rescue a mic that cost three times as much as the one above.
Step two: Set the distance and the angle. Four to six inches from your mouth, aimed slightly across your mouth rather than straight down your throat. The closer you get, the more low end you pick up, which is the proximity effect. A thin voice can use that help. Go too close and you trade it for plosives and mud. Four to six inches is the window.
Step three: Gain staging, done simply. Set the input gain so your loudest normal sentence peaks around -12 to -6 dBFS, not at zero. If the meter touches the top, you have already lost the take. Speak the loudest line of the episode, watch the meter, set the gain, and then leave it alone for the rest of the session.
Step four: Treat the space behind you, not just behind the mic. A blanket behind the microphone does very little. The reflections that reach the capsule come from the wall in front of your face and the ceiling above it. Hang a moving blanket or a heavy quilt on the wall you face, and put a rug down if you have hard floors. This is the cheapest quality upgrade in audio.
Step five: Hunt the noise floor. Turn off the HVAC, the ceiling fan, and the fridge hum you stopped noticing months ago. Put your phone in another room. Record 30 seconds of silence and look at the noise floor in your editor. If it is dancing, you have a noise problem, and no microphone fixes a noise problem.
Step six: Handle plosives at the source. Back off a half inch and speak slightly across the capsule rather than straight into it. A pop filter helps, but placement helps more and costs nothing.
Step seven: Record a scratch minute and listen before the real take. One minute, then stop and listen on headphones. Check for clipping, check for a hum, check that your chair is not squeaking. Finding that after a 40 minute episode is a bad afternoon.
Step eight: Do the edit bay pass. Drop the scratch minute into your editor, listen at 1.5x, then listen on a phone speaker. If the voice holds up on a phone, it holds up anywhere. If it sounds thin there, you probably drifted away from the mic halfway through.
The settings that matter and the ones that do not
Sample rate and bit depth: 44.1 kHz or 48 kHz at 24 bit is plenty for voice. Nobody has ever clicked away from a podcast because it was not recorded at 96 kHz.
Do not stack processing while you record. Capture clean, then compress and EQ in the edit. On-mic DSP is convenient and I expect it to become standard, but it locks your decisions in before you know what the episode needs.
Do not monitor through the computer if you can avoid it. Latency makes people rush and flatten their delivery. If your mic offers a way to hear yourself without that delay, use it, because your performance matters more than any plugin.
What not to do
Do not buy a condenser first. A large-diaphragm condenser in an untreated bedroom picks up the room, the street, and the fan in the next room, and it makes all of it sound expensive and wrong. Condensers are for treated rooms. Dynamics are for real life.
Do not assume a blanket fort is the answer. A closet full of clothes can sound boxy and dead, and you will spend the next month wondering why your voice sounds like it is being recorded inside a jacket.
Do not re-record a whole episode because of one plosive. Fix the sentence, or fix it in the edit. Re-recording 40 minutes to repair a pop is how people quit podcasting.
Do not buy a new mic when your noise floor is the problem. The upgrade treadmill is real and expensive. Measure the room before you spend, and remember that a microphone you are afraid to use is worse than a worse microphone you use every week.
Why the obvious alternative is the wrong first mic
A USB condenser is the obvious alternative, and in a treated room it is a fine choice. For a first purchase in an apartment, it is the wrong tool. It hears everything, which sounds like a compliment until you hear your own refrigerator on the track.
The XLR and interface path is the other alternative. It is the right answer for people who know why they need it: multiple mics, a mixer, a guest across the table, or a room they have already fixed. If you cannot explain what the interface buys you, you do not need it yet. A USB and XLR mic lets you wait and decide later, which is the entire point of buying one.
What this costs
The microphone is one purchase, and the current Amazon price is at the link above. The rest of the list is either free or already in your apartment: a boom arm if you do not own one, a blanket, a rug, and 20 minutes of turning things off.
There is no interface in this list and no subscription. If you record weekly for a year, the per-episode cost of the mic is its price divided by 52, and the acoustic treatment is your quilt divided by zero, because you already owned the quilt.
That is the first $200 of audio gear, and most of it is not gear. The mic gets you a signal. The room and the distance get you a show.
The short version
Get a USB dynamic mic, get it off the desk, get within four to six inches, set your gain so the loudest line peaks around -12 to -6 dBFS, hang something soft on the wall you face, turn off everything that hums, and record a scratch minute before every session.
Do that and your USB dynamic microphone setup will beat a far more expensive microphone sitting in a room nobody fixed. The gear was never the hard part. The order of operations is.